The post Hello world! appeared first on Elohim Rehab-Care Associates.
]]>The post Hello world! appeared first on Elohim Rehab-Care Associates.
]]>The post How to create a WordPress Child Theme appeared first on Elohim Rehab-Care Associates.
]]>But this doesn’t mean that you need to create a child theme even for a few tweaks on the style like – changing fonts, base colour. For this, you can use customizer based themes which won’t revert your customization even after theme update.
Another advantage of using a child theme is it also helps in developing a WordPress website quicker. As a child theme uses the parent theme’s framework, it will speed up the development process.
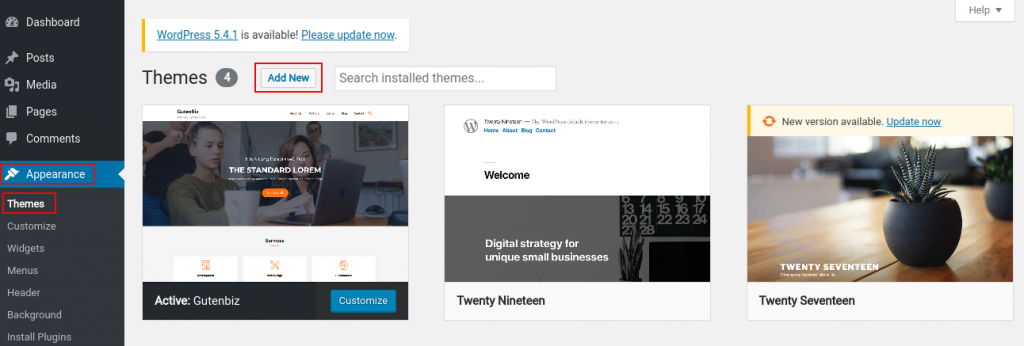
Creating a child theme is very easy. You can either create a child theme manually or by using a plugin. We will share both methods in this article but before that, we need a parent theme installed on our WordPress website. Hence, we have installed Gutenbiz, a Gutenberg ready multipurpose theme, as a parent theme. You can also install this amazing multipurpose WordPress Theme and follow the direction. But if you want to create a child theme for any other WordPress theme, ensure you have already installed the parent theme.
How to create a child theme in WordPress manually.
- Create a folder using the parent theme’s name followed by a -child suffix. Eg: Gutenbiz-child.
- Create a style.css file with the following information and save it in the folder.
/**
Theme Name: Gutenbiz Child
Theme URI: *Your website URL
Author: *Your Name
Author URI: *Your Url
Description: Describe your theme and its function
Template: gutenbiz
License: GNU General Public License v2 or later
License URI: https://www.gnu.org/licenses/gpl-2.0.html
Text Domain: gutenbiz-child
/ Custom CSS goes after this line
- While preparing a style.css file, it’s important to mention the template because it tells WordPress about the parent theme – Gutenbiz. It will show the style and functionality of the parent theme until and unless it’s overwritten by the child theme.
- Create another file and name it functions.php. Write the following code and save it in the same folder. You don’t need to copy the codes from functions.php of the parent theme as these codes need to be stored separately.
<?php
add_action( 'wp_enqueue_scripts', 'enqueue_parent_styles' );

function enqueue_parent_styles() {
  wp_enqueue_style( 'parent-style', get_template_directory_uri().'/style.css' );
}
?>
- You can add functionality as per your need to the specific page. Remember to make a duplicate file and add your code and save it in the child theme folder.
- Compress your folder in .zip format
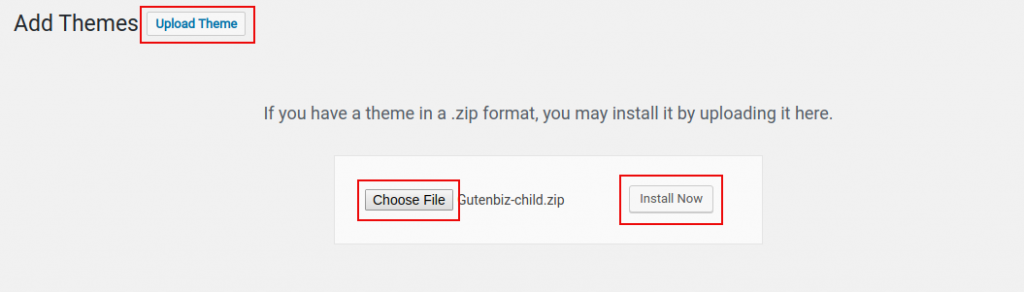
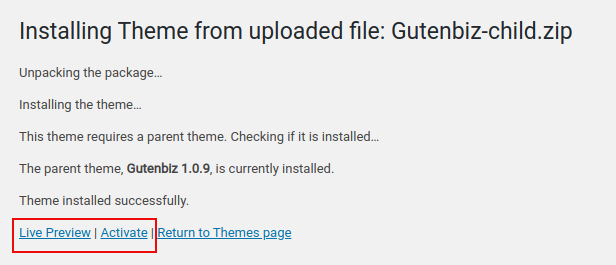
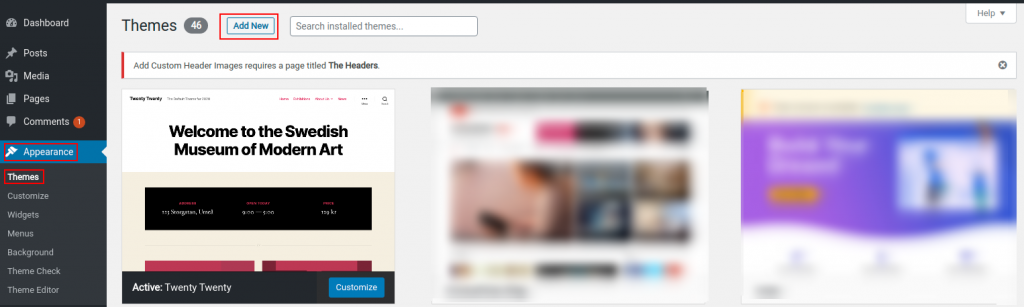
- Now your child theme is ready. Upload it through WordPress -> Appearance -> Themes -> Add New -> Upload Theme -> Choose File -> Install Now.
- Lastly activate it to use its style and functionality.
How to create a WordPress child theme using plugin.
Another method of creating a child theme is by using plugins. If you search in the repository then you will find a lot of plugins that can help you to build a child theme. But till date, most of the people use the Child Theme Configurator plugin.
You can follow the following steps to create a child theme.
Install the plugin:
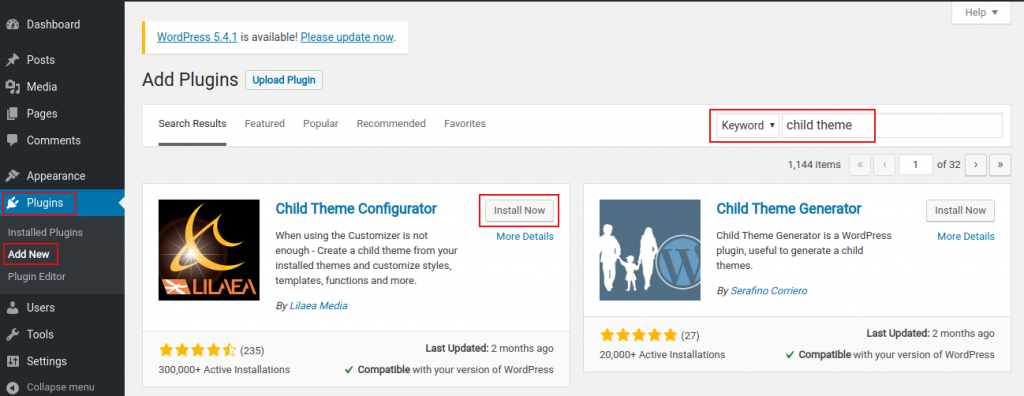
- Go to plugins and then “Add new” to install a new plugin.
- Type Child Theme into the search box.
- You will get the Child Theme Configurator Plugin in the search result.
- Click the “Install Now” button to install the plugin and then finally activate it.
Generate a Child Theme
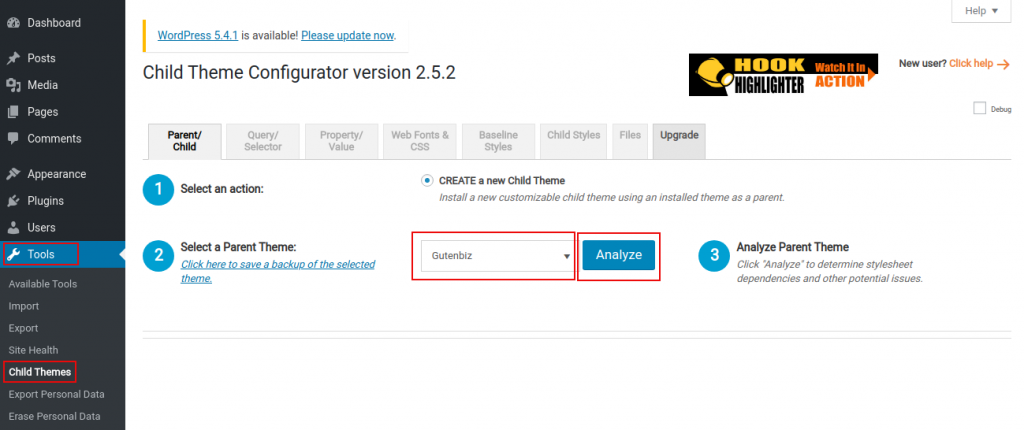
- After Installation, got to Tools -> Child Themes. It will display the Child Theme Configurator’s setting to create a child theme.
- Now select a parent theme, “Gutenbiz” and then click on the Analyze button.
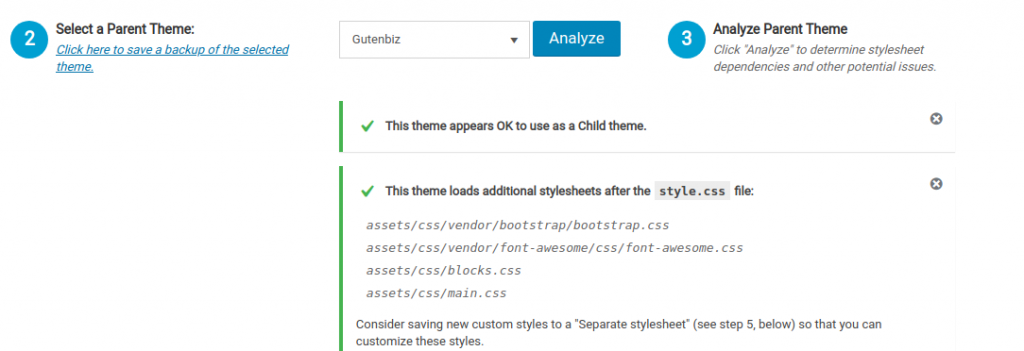
- After analyzing, it will display that the theme is okay to use as a Child Theme and hence displays additional settings. If you are using another WordPress Theme be sure to look for this message.
- You can leave these options as in default settings. Now click on the “Create New Child Theme” button to create a child theme.

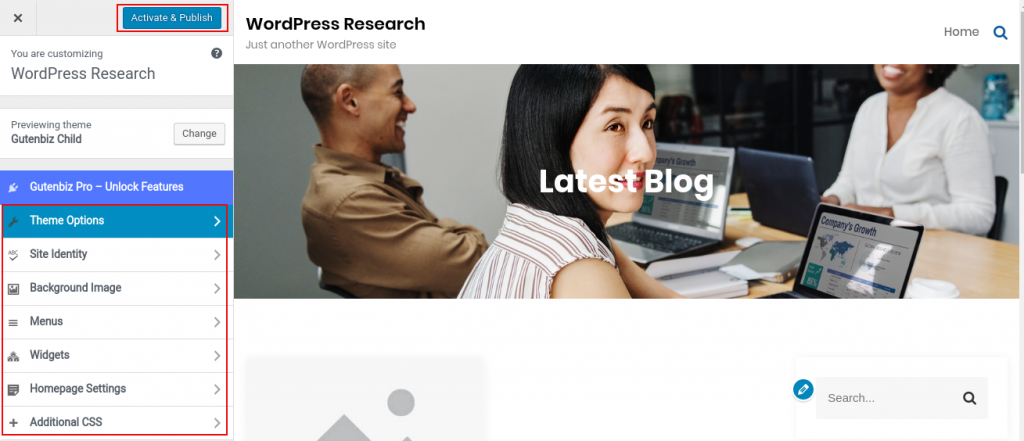
- You should see the “Child Theme Gutenbiz Child has been generated successfully” message after the plugin title. Additionally, you will be also requested to preview your child theme before activating. It’s a better idea to preview the child theme to ensure everything is working fine.

- Now preview, customize, activate, and publish the child theme.
Gutenbiz- Light WordPress Child Theme
If you are unsure of creating a child theme manually and also don’t want extra plugins in your WordPress dashboard but you insist on having a child theme then you can check Gutenbiz light, a child theme of Gutenbiz WordPress Theme. It’s free, light-weight and fully compatible with Gutenberg Blocks. Additionally, you can use Rise Blocks for awesome layouts.
Conclusion
Well, you might know now that it isn’t too difficult to create a child theme in WordPress manually or by using a plugin. With child themes, it allows us to safely customize the style and functionality of the theme without editing any core files and also keeping us safe from the theme updates. If you run through any issue while creating a child theme or have any questions, feel free to leave a comment in the section below.
The post How to create a WordPress Child Theme appeared first on Elohim Rehab-Care Associates.
]]>The post Bizline Pro – clean and elegant WordPress theme appeared first on Elohim Rehab-Care Associates.
]]>Highlights: This theme includes –
Customization
- Homepage / Frontpage Options
- Theme Options
- Site Identity
- Background Image
- Menus
- Widgets
- Homepage Settings
- WooCommerce
- Additional CSS
Homepage Section
- Slider (unlimited pages)
- Quotes
- Services
- Feature
- Testimonial (unlimited pages)
- Team
- Call to Action section
- News and Updates sections.
- Advanced Options (rearrange order available in Pro version)
Theme Options
- Top Bar
- Header Options (available only in Pro version)
- Typography (more than 10+ font family in Pro version)
- Color Options
- Breadcrumb Options
- Scroll to Top Option (available only in Pro version)
- Inner Banner Options
- Footer Options
- Posts Options
- Sidebar Options
- Additional Options
Bizline Pro Features
To deliver a beautiful and functional website, we added additional features in Bizline Pro along with dedicated support. These are:
Homepage / Frontpage Options
Unlimited Sliders – Since a slider is displayed on the Above The Fold area, you must display the content that connects with your potential clients. With Pro version, you are not limited to no. of pages that you can show in this section. Hence you can take advantage and display your most important services or products and attract potential customers/ clients.
Advanced option: Section order – With Pro version, you are free to reorder the available sections on the homepage. It is useful when you value a certain section over others. When you find this then you can rearrange the order with the most valuable section at the top.
Unlimited Testimonials – Among many, testimonials and reviews are one of the factors to develop trust in online platforms. By reading testimonials and reviews, one can determine how reliable a company is. So higher the quality and quantity of reviews and testimonials, users can figure out the reliability and authenticity. With Pro version, you are not limited to no. of testimonials and reviews that you want to show in this section.

Theme Options
Top Bar – You can customize the top bar as you like. With Pro version, you can add extra visual elements – like change social icon layout along with the border, change the background, and text color.

Header Options – This option is available in Pro version only. Tweaking this option, you can toggle the search icon and fixed header. Along with that, you have three different options for the header layout.

Typography Options – Pro version is equipped with additional 10+ font family than in the Free version. Additionally, you have the option to determine font size, font weight, text transformation, font style, letter spacing, and line-height for Site Identity, Body Text, Post Title, Primary Menu, Widget Title, and Widget Content.


Scroll To Top Options – This option is available in Pro version only. With this option, you will be able to add a feature that helps to go to the top of the web page instantly. This feature is helpful when the webpage is long and you need to go to another page through the header menu. Regarding the options, you can pick up the icon from available designs. Tweaking the Icon and Background color will help you to make the icon contrast. Additionally, you can determine the icon border from a perfect square to a circle. Lastly, you can display the icon either left or right of the web page. If you don’t want to display it, then you can hide it as well.

Footer Options – With Pro version, you can display social menu icons along with the Business name at the footer.

Site Identity
Site identity Layout – You can tweak on how Site Identity is displayed with Pro version. For site identity layout to work, you must use both logo and tagline otherwise it won’t have any effect.

Dedicated Support
If you need help while using the theme then you can contact us. We will provide you dedicated support through a live chat support system.
Rise Blocks Pro
Along with additional features, the Blizline Pro version WordPress theme also includes Rise Blocks Pro. It is a gallery of lightweight blocks for a WordPress editor. With Bizline WordPress Theme and Rise Blocks, you can make stunning layouts for your website even though you have zero knowledge in coding.
Lastly
Bizline WordPress Theme – Pro version is a customizer based WordPress theme. It is best suited for a business website. You can also use it for eCommerce websites using the WooCommerce Plugin. Since it is equipped with Rise Blocks Pro, you can use it to develop other types of websites as well.
The post Bizline Pro – clean and elegant WordPress theme appeared first on Elohim Rehab-Care Associates.
]]>The post Bizline, Elegant WordPress Theme based on Theme Customizer and Gutenberg Blocks appeared first on Elohim Rehab-Care Associates.
]]>Highlights: This theme includes –
Customozation
- Homepage/ Frontpage Options
- Theme Options
- Site Identity (Site Identity Layout available in Pro version)
- Background Image
- Menus
- Widgets
- Homepage Settings
- WooCommerce
- Additional CSS
Homepage Section
- Slider – limited slides (unlimited in Pro version)
- Quotes
- Services
- Feature
- Testimonial – limited (unlimited in Pro version)
- Team
- Call to Action section
- News and Updates sections.
- Advanced Options. (rearrange order available in Pro version)
Theme Options
- Top Bar
- Header Options (available only in Pro version)
- Typography (More than 10+ font family in Pro version)
- Color Options
- Breadcrumb Options
- Scroll to Top Option (available only in Pro version)
- Inner Banner Options
- Footer Options
- Posts Options
- Sidebar Options
- Additional Options
Reasons to choose Bizline, Clean and Elegant WordPress Theme
The main reasons to choose Bizline are as follows:
Responsive design: The theme is compatible with all devices. Additionally, some blocks have a feature to make the content responsive – spacing (padding and margin); and stacking the content.
Clean Code: The theme is built with clean codes. It is well organized and easy to understand.
Breadcrumbs: The theme is already equipped with breadcrumbs so users don’t need to install other 3rd party plugins.
SEO Ready: The theme is developed with the latest coding standards. It is fast, compatible with all popular browsers and responsive to all devices. Along with that Bizline is compatible with most SEO plugins to get extra features on your website.
One-Click Demo Import: The theme supports demo import. You can easily import demos to your website. Once uploaded you can then add the content, images, and details to the website.
Pagination Options: The theme is equipped with a pagination feature. You can easily organize your content and show it to your visitor.
Unlimited Colors Skins: With this feature, you can get a unique and different design that will set you apart from others.
Quick and Friendly Support: In case of an issue, you can consult with the support team through live chat support or check the documentation.
How to install a WordPress theme – Bizline
You can go along with the following steps to install the theme.
- Hover Appearance on the left sidebar. Under Appearance, click on themes and then click on Add New button.
- Search Bizline from the theme repository through a search bar available on the right side.
- Or If you have a zip file, you can upload it through this page. Click upload theme button accessible aside of the Add Themes heading. You will get the option to upload a zip file. Choose Bizline through the file manager and upload it.
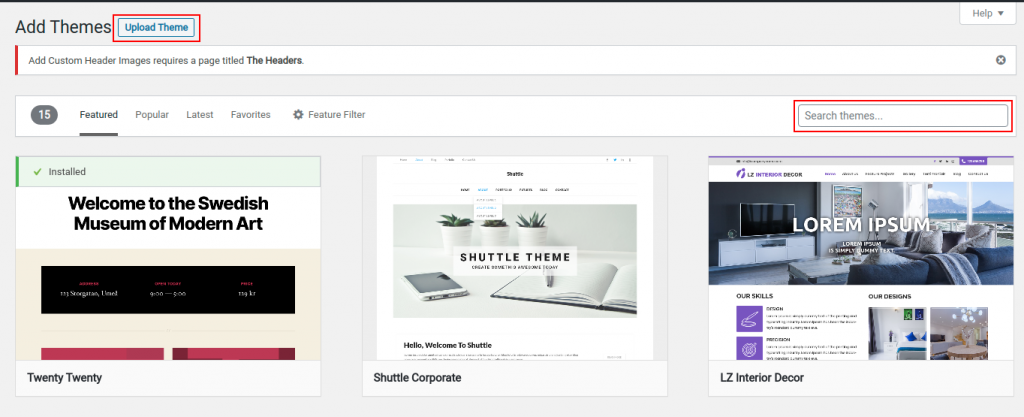
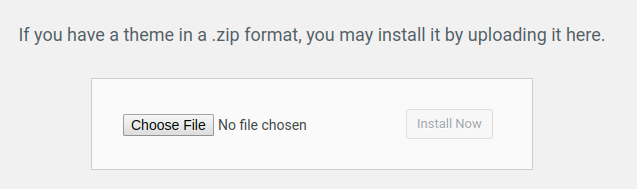
- Finally, install it by clicking the “Install Now” button.
How to Customize WordPress theme – Bizline
Since Bizline theme is a responsive WordPress theme based on theme customizer and Gutenberg blocks, you can change the way it is displayed after the installation. You have the power to present the theme in a completely different outlook. As for the customization, you can go along with the following steps to customize the theme.
- Hover on Appearance section found on the left sidebar of your WordPress dashboard.
- As you hover, slide to the left on the subsection and click on the customize button found just under themes.
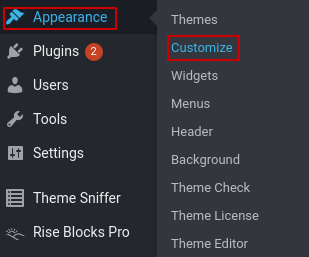
- Then you will be directed to the customizer page. Here you can modify the theme through the settings accessible from the left sidebar. On the right side, you will find a live preview of your site. By looking at the preview you can determine the changes you want for your website.
- In the customizer setting, You have the choice to modify homepage (frontpage), change the theme options, Site Identity, Background Image, create and deploy menus and widgets, along with writing custom CSS that you want to implement.

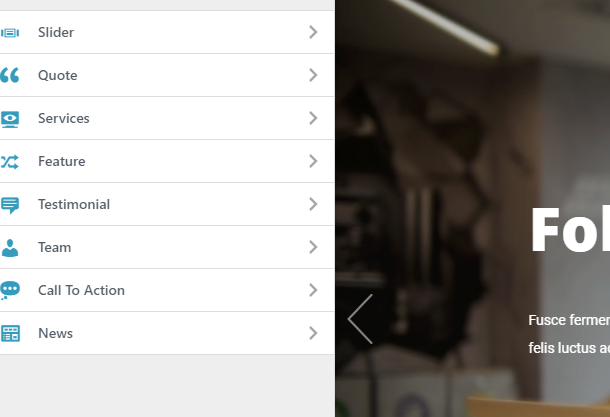
- For the homepage options, you will get Slider, quote Services, features, testimonial, team, call to action, News sections. You can go to individual sections to modify the settings as per your requirements.
- After you have made necessary changes, it’s time to save and publish the website. The save and publish button is in the top right corner of the sidebar. Click the button to save the changes.
How to Import demo data in WordPress theme – Bizline
If you would like to get the same setting as that of the demo then you just need the demo content. For that, you can do one of the following steps.
- Download this demo content. Unzip the file and then hover on the Tools section found on the left sidebar of your WordPress dashboard. Click on Import and then WordPress Importer to import the demo content. Now, upload the already downloaded content. You will now have the same setting as that of the demo content. Please change the images and other dummy texts.
- You can also import the demo content through a widely used plugin, Customer Export/Import Plugin. Install this plugin through the plugin section. Now download this demo content. Unzip the file and then upload the content through the Import/Export section found in the Customizer.
Note: if you are having issues while uploading demo data then we can help you. Contact us to learn about the scope.
Conclusion
This article is about a clean and elegant WordPress theme – Bizline (free version). The theme is based on theme customizer and is fully compatible with the WordPress editor ( block editor ). If you would like to get dedicated support with premium features then you can check PRO VERSION. With this version, you can re-order the sections of the homepage as per your need; change the social icon layout, additional header and typography options, and scroll to top features along with customization.
The post Bizline, Elegant WordPress Theme based on Theme Customizer and Gutenberg Blocks appeared first on Elohim Rehab-Care Associates.
]]>The post How to create a homepage banner appeared first on Elohim Rehab-Care Associates.
]]>For a banner to be effective, we must include the following parts:
- A pleasing design along with a conceptual image
- A clearly stated descriptive headline
- Call to action button
When these components are present with persuasive content, there is likely to be more inquiry or visits to the service page. That’s why online marketers suggest business owners to have an effective homepage banner.
How to create a homepage banner with Rise Blocks.
There are multiple ways to create a banner section for your home page. We will go through the two methods using Rise Blocks so that you will learn how to create an effective homepage banner.
Using Section block, Advance heading block, and advance button block

You can create this banner image using a combination of section block, advance heading block, and advance button block. Here are the steps on how you can get this banner section for your homepage.
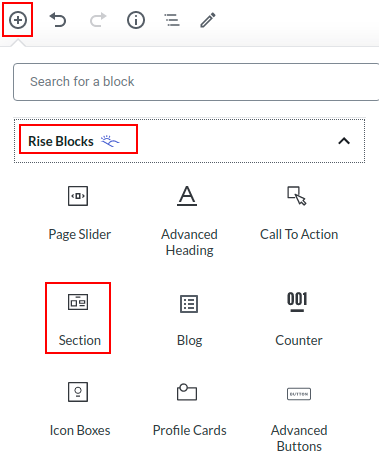
- First, click on the Add block icon and then click on the Rise Blocks category.
- Click on the Section block icon to get a section in your WordPress editor.
- Select the Section block. You will find the Block setting in the right sidebar. Now, you need to customize the setting in order to get the desired outcome.
- Under General settings, click on full width as a container type.

- Choose the Image as a background type and select your desired image.
- Set image size as full. You can set the background-position as default, top center, or center according to the nature of the image.
- If you like to overlay the image with color then use a background overlay setting. You can choose the color value and opacity of the color from the setting.

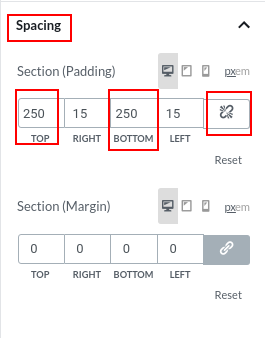
- Now it’s time for spacing. Under Section (padding) section, click the link button to unlink top, right, bottom, and left from each other.
- You can now put the desired value in the top and bottom in order to make the heading in the middle of the banner.
- Now add the Advanced Heading block with the same process as that of Section block.
- Write the heading. You can also add a label and subheading if you wish.
- Under the color section, you can choose a color for the label, heading, separator, and subheading to match the background image.

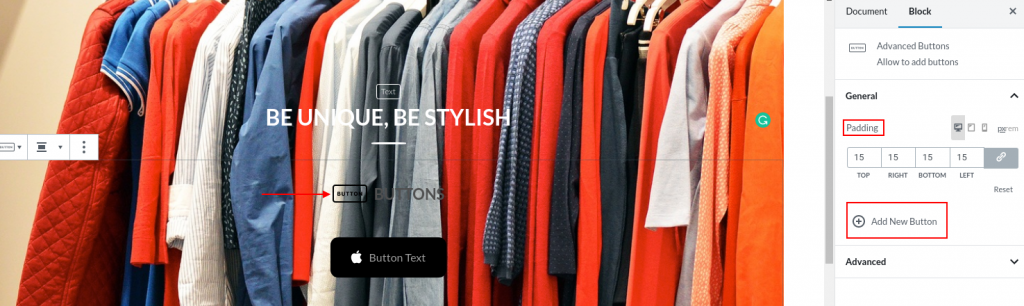
- To get the Advanced buttons block, follow the same step as that of Section block and Advanced Heading block. In the right sidebar, you will get a Block setting to customize the button.
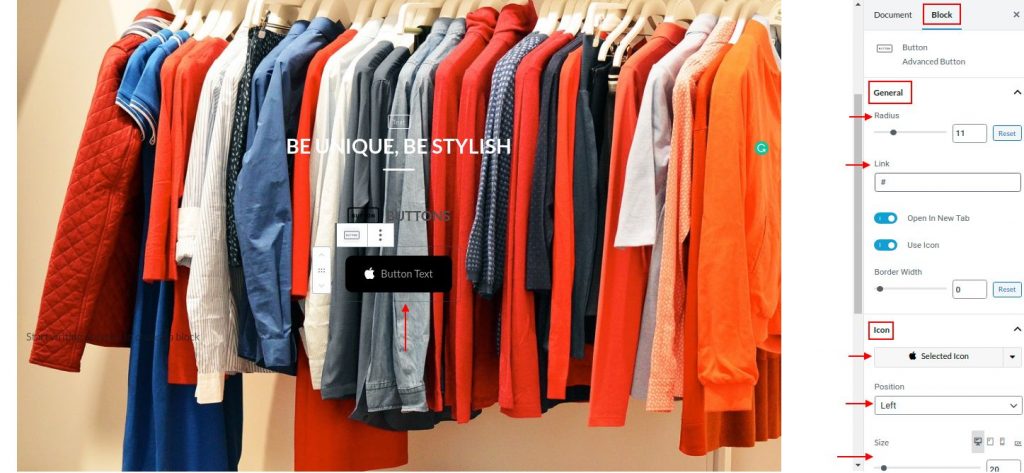
- Click the button to edit the text, you can bold or italicize the text.
- You can make a rectangle button or a curved one. Just mention your desired radius under the General section of setting, 0 for rectangle and 50 for a curved one.
- Put the link of the page that you want the visitor to follow after clicking the button.
- You can also customize the icon – icon selection, position, and size. These settings are accessible under the heading of Icon in Block setting.
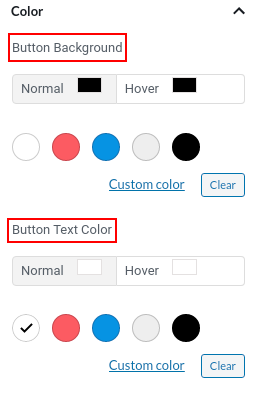
- If you would like to change the color of the heading then you can do that from color heading.
- To add another button, select the Advanced Button block. In the block setting, click the Add New Button icon to add a new button. Make necessary customization as per the earlier button.
- Here’s your homepage banner for the website.
Using Page Slider
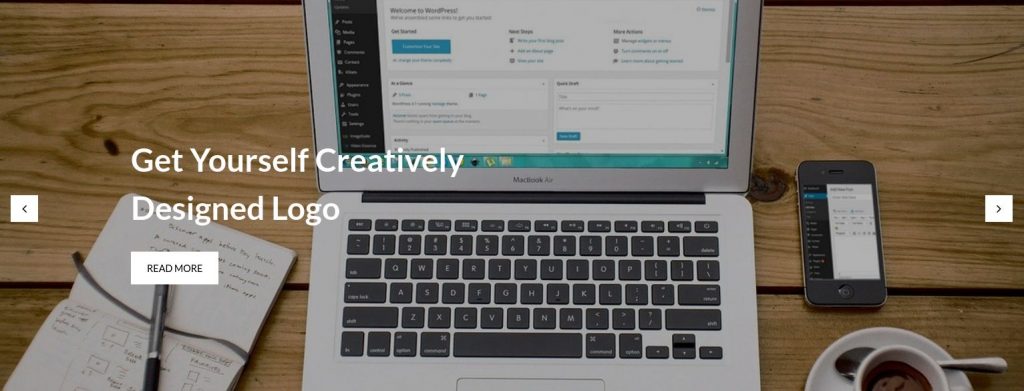
The beauty of a Rise Blocks comes into play when you can use only one block to make an awesome homepage banner. And that is by using Page Slider block. This block fetches other pages’ heading, excerpts, and featured images. Then displays it in a carousel layout with a link to that specific page. Here are the steps that you can follow to get an awesome homepage banner through Page Slider.
- First, create service pages for your website. Ensure that you set a Featured image on each service page that you wish to display on the website.
- After you have a service page, head back to the homepage
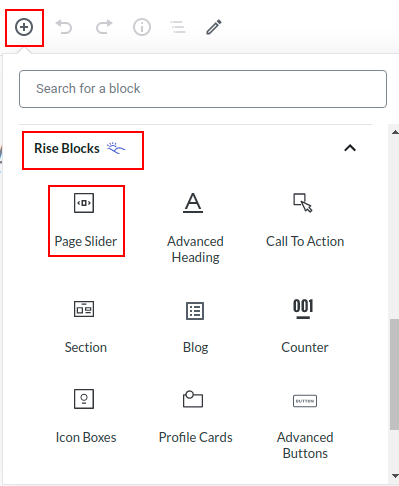
- Click Add Block icon accessible from the top left corner of the WordPress editor and then on Rise Blocks category.
- Click on the Page Slider block icon to get a slider in your WordPress editor.
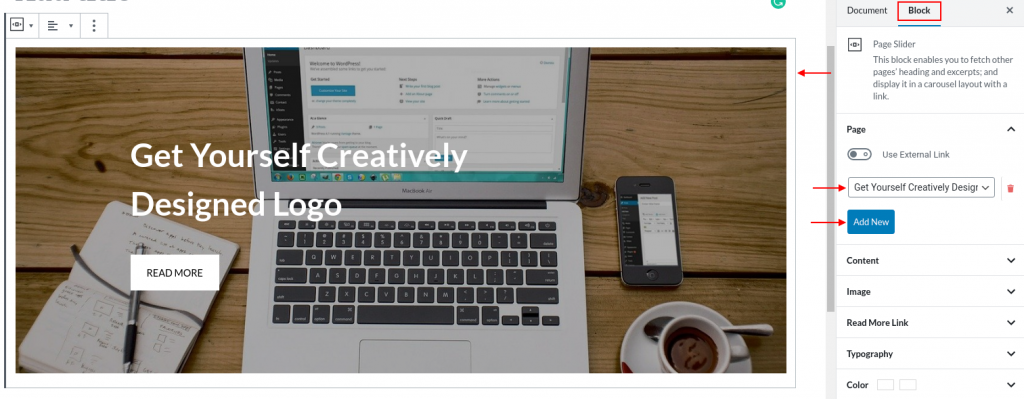
- In the Block setting available in the right sidebar, you will get the option to add a new page.
- Click the button to activate the setting. On the drop-down under the Page section, you will find the option to add a page.
- Select your service page. You will find that the page slider will get refreshed and the block in the WordPress editor will display the page’s Featured image on the background with the page title as Heading along with the Read More button.
- If you wish to add other pages then repeat the above step till you get desired pages to display in the slider.
- Through the Block setting, you can also customize the banner section to make it attractive.
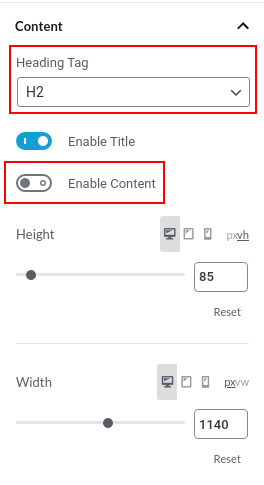
- Under the content section of the Block setting, you can toggle the heading tag. Ensure to turn off the Enable Content option as we don’t want to display the excerpt in the slider.
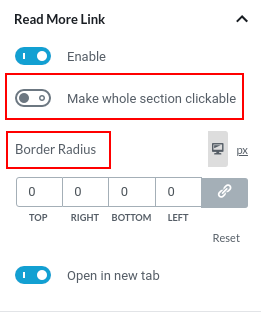
- If you would like to hide the Read More button, and make the whole section clickable, activate the option accessible under the Read More Link Section. In this section you can also adjust Border Radius as per your requirement, either make the button rectangle or with a curved button.
- Lastly from the Color section, you can customize the color of the title and also insert overlay to the background image.

- Here’s the homepage banner for your website.
Conclusion
With this article, you learned how to create a homepage banner, manually for your website. For your ease, we have already created some banner templates. if you have installed themes from Rise Theme, then you can import these templates through the Get Rise Blocks Templates button available on the Document setting in the right sidebar. After clicking the button, Rise Block library is popped up, don’t forget to click – Components accessible in the top right corner of the pop-up. Click on the banner menu, there you will find awesome banner designs. Click on the Insert button to get the design. If you still have a problem understanding this article, then feel free to comment on this article.
The post How to create a homepage banner appeared first on Elohim Rehab-Care Associates.
]]>The post Advantage of Gutenberg Blocks over Classic Editor appeared first on Elohim Rehab-Care Associates.
]]>Gutenberg Blocks / WordPress Editor
Gutenberg Blocks was named after the first creator of the mechanical printing press, Johannes Gutenberg. During the development phase, the editor was called Gutenberg blocks. Now, it’s termed as a WordPress Editor or just Block Editor. The current editor is completely different from the earlier equipped TinyMCE editor. It provides a better user interface and user experience in comparison with the TinyMCE editor. You can arrange the layout through drag and drop features. Hence, even laymen with zero knowledge of coding can arrange the content and get beautiful web pages.
For every section, there is a distinct block to present the content. You can grab the desired block from the block library. These blocks have their own set of settings to make the content appealing. The setting is shown only when the block is selected and is displayed in the right sidebar.
Default blocks
There are a handful of blocks in the default block editor library arranged according to the following categories. These are:
- Common Blocks: This category includes frequently used blocks like heading, paragraph, image, video, list, etc.
- Formatting: You can leverage formatting options like pull-quote, table, verse, custom HTML, etc. through blocks available in this category.
- Layout Elements: This category provides additional options for the page layout. Buttons, Columns, Group, Spacer, etc are useful blocks that are included in this category.
- Widgets: Widgets category comprises different blocks that help to display archives, latest posts, latest comments, etc. these blocks are frequently used in sidebar and footer areas.
- Embeds: The blocks within this category help us to embed posts from different social media channels.

Rise Blocks

It’s true that with the introduction of Block Editor, people with no experience in coding are also able to create beautiful web pages. But it is also a fact that only the default block editor is not sufficient to get awesome pages. Hence, web developers and designers worked together to create new blocks. They not only focused on creating elegant web pages but also to incorporate complex functionality to the website.
You can find different blocks available in the WordPress repository and one of them is Rise Blocks. Rise Blocks is a minimalistic WordPress block plugin. Currently, it has 10 blocks but the team is working hard to provide more blocks soon. Since Rise Blocks is minimalistic and lightweight you don’t have to worry about unwanted codes stored on the website. Additionally, if you are inclined on lightweights then Rise Blocks is best suited for your projects.
Benefits of Gutenberg Blocks and Rise Blocks over Classical editor
With a block editor installed in your WordPress website, you have additional benefits from creating beautiful designs to custom layout. Along with that, there are other benefits of Gutenberg blocks and they are as follows:
Content-focused editor
With a new editor, you can focus on your content without any distractions. You can enter into full-screen mode and exit when not in use. Even the block toolbar hides while writing. When needed you can position the mouse cursor to the block toolbar position.
Create Complex layout instantly
You can implement a layout like a table, column, etc easily on the web page. It was hard in the previous editor as you need to have coding knowledge. But with this block editor, you can choose the desired layout block to implement on the website. Additionally, you can get other different layouts.
Mobile-Friendly
With the easy access and availability of WordPress in smartphones, people are more inclined to create posts through their mobile. Thanks to Gutenberg blocks, users can easily create their posts along with a beautiful layout which was difficult through TinyMCE Editor.
Social Media Embeds
WordPress editor has social media embed blocks that can embed videos, images, and any other form directly into the content. In the previous editor, we had to install a separate plugin but that was a hassle to download. Additionally, the plugin would add up the website size.
Conclusion
With this article, you have an idea about the advantages of using WordPress editor. With this editor installed, you don’t need to worry about complex layouts and responsiveness. It doesn’t mean that the editor has any disadvantages but the benefits overshadow the disadvantages. If you have any questions while reading this article then feel free to leave a comment in the section below.
The post Advantage of Gutenberg Blocks over Classic Editor appeared first on Elohim Rehab-Care Associates.
]]>The post How to create a one-page website in WordPress with Rise Blocks appeared first on Elohim Rehab-Care Associates.
]]>One-page website
The one-page website is a website with just a homepage with all necessary sections. There are pros and cons of using a one-page website but it’s a good practice if you are running a new business or the clients are your close circle.
The important aspect while making a one-page WordPress website is a visually appealing WordPress theme and minimalistic Gutenberg Blocks. On installation of the latest WordPress, we get default blocks but they still lack functionality and layouts. Hence, you can install a Gutenberg Block plugin to enhance the beauty of your website. You can try themes from Rise Themes and Rise Blocks. They both are developed with minimalistic in mind. So, you are free from unwanted and unused codes.
Rise Blocks, a minimalistic Gutenberg blocks
With Rise Blocks, you can create multiple elegant layouts for your website. Since it is minimalistic and lightweight, you don’t have to deal with unwanted codes. Therefore, it helps to increase page speed and reduce bounce rate.
Note: Currently, you can enjoy the following blocks:
Section,
Advanced Heading,
Slider,
Profile Cards,
Icon Boxes,
News and Blog,
Counter,
Call to Action,
Advanced Button, and
Social Links.
For beautiful demos prepared with Rise Blocks, Click here.
How to create a one-page website in WordPress
We believe you know how to install WordPress CMS, activate the WordPress theme and Rise Blocks plugin. If you are uncertain then you can follow this documentation to install Rise Blocks.
With the setup, follow these steps to create a beautiful single-page website.
Note: Please read an earlier article to learn how to create a custom homepage in WordPress as a single-page website has only one page which is a custom homepage.
Design your homepage with Rise Blocks
Here are the possible sections for your homepage.
Banner image section: People tend to scroll as the webpage loads. Hence, the above-the-fold section needs to be attractive and informative. You can display a banner with an awesome image with heading to attract the people. Section block equipped with the Advanced Heading block will help you to get the banner image section.
About section: It’s where you share about your business or yourself if you are a freelancer. It is important as the client seeks information about the business before they opt-in specific service. You can use Advanced Heading block along with Paragraph block to display information.
Services section: This section displays the services you provide for your client. You can use Icon Boxes block along with Advanced Heading block for the section title. It’s better to provide additional information on the description section.
Call to action section: This is a crucial section as it helps to motivate your client to contact you and get additional information on the services. You can use Call to Action block to get attractive section
Portfolio section: Through this section, people will find out your past works. It also helps to develop trust in your services. As online trust is crucial to get leads, you need to be cautious about how you portray your works. You can use Profile Cards block with Advanced Heading to display the section title. With the label feature available on Profile Cards block, you can categorize your works.
Review section: Reviews from your client is another factor that helps to develop online trust for possible clients. You can use Profile cards block along with Advanced Heading to display reviews.
Contact and social media section: Lastly, you need a contact section for further communication. You can use Advanced Heading block and paragraph block for contact details. Additionally, you can use Social Links block to display your social media links.
A Quick Tip: If you insert the above-mentioned blocks in a section block for all sections, you can do additional customization.
Note: Rise Blocks documentation covers all information on blocks. So, please follow the guide to learn the steps to implement the blocks for an awesome layout for your website. You can also import the demo layout and then make necessary changes.
How to create a header menu for a single-page website
To create a Header menu, we should know what anchor and anchor links are. An anchor is a destination when anchor links are clicked. Anchors links are normal links that start with # character along with id assigned to the anchor. Hence, our anchors will be at the individual section title while anchor links will be in the header menu.
For example,
Anchor link - <a href="#about">About us</a>
Anchor - <h2 id="about">About us</h2>
Advanced Heading block has section id, so we don’t need to insert it manually. Just copy the section title and the id associated with it to create the header menu. You can follow these steps to get the id associated with the section title.
- Click on the specific section title.
- You will find three horizontal dots in the Block toolbar.
- Click the dots and then find Edit as HTML.

- Copy id associated with this section title, separately.

- Do this for all sections.
You have the section title and id associated with it. Now, let’s create a header menu for navigation.
- Hover on Appearance found on the left sidebar.
- Find the menu and click on it

- If you can’t find any menu to select then you can create a new menu. or
- If there is a primary menu then you can select and edit it.

- Name the menu and hit the create menu button.

- Click on custom links available on the left side.
- Add section title on the link text and section id that you copied on the URL. Then, click on the Add to Menu button. Do it for all the sections.

- Now, set display location to primary and then click on the save menu to save it.

- You now have a single-page website for your business.
Conclusion
With this article, you understood what is a one-page website? and when to use it. Additionally, you also learned how to create a one-page website in WordPress using Rise Blocks. Additionally, you can add smooth scrolling, sticky header, and a top button for visually appealing. If you stumble upon any issue while creating a one-page website or have any questions regarding Rise Blocks, feel free to leave a comment in the section below.
The post How to create a one-page website in WordPress with Rise Blocks appeared first on Elohim Rehab-Care Associates.
]]>The post How to create a homepage on WordPress website using Gutenberg block editor appeared first on Elohim Rehab-Care Associates.
]]>Note: Gutenberg Blocks are newly introduced text editor in WordPress from only 5.0 version. Please check which version you have. Additionally, if you have Classic Editor installed in your WordPress then Rise Blocks won’t work correctly. First, you have to deactivate it through plugin settings then only you will be able to enjoy the full feature of Rise Blocks
But first, let’s understand why we need a home page with an elegant design.
Reasons behind choosing an elegant home page design.
In the present context, many people summarize the content of a website on the homepage. Therefore, people are prone to visit the homepage to grab the information all at once. Hence, you need to have a beautifully designed homepage because people tend to engage with awesome and clear design rather than with a lousy one. Additionally, an elegant and clean design gives people a clear focus on what they are seeking. The elegant design delivers better user experience and thus has an opportunity to convert the visitors into leads for your business.
Setting a custom homepage in WordPress website
On the fresh installation of WordPress, the homepage is set to show the most recent posts. This is because WordPress was developed as a CMS for blogs, initially. With time, it didn’t limit itself to blogs, rather it is used for multiple purposes like small business, e-commerce sites, etc. With that, you can now set a specific page to be the homepage of your site instead of recent posts. Here are the steps on how to create a custom homepage.
- Create a new page with the title “Home”.
- Design your page according to your needs.
- Click the publish button available on the right side of the screen to make it live.

- Now we need a blog page to show recent posts. So, create another page with the title “Blog”.
- Click the publish button without designing the page, as this page acts as an archive page for the blog posts.

- Click the setting option available in the left admin panel. Then go to the Reading Settings and click it.

- Here, you will get a choice to display your homepage as your latest posts or a static page. Click the radio button for “A static page”. Then choose “Home” as a homepage and “Blog” as a posts page. Then click on the “Save Changes” button to save the setting available on the bottom left side.

You just created a custom homepage for your website. Design wisely, as this will be where visitors are often attracted to. If you find it hard to design the page, you can use a Rise Block to do the job for you.
Creating awesome homepage instantly using Rise Blocks
Rise Blocks is a lightweight Gutenberg WordPress block. It has almost all the blocks necessary to build awesome and beautiful designs. Since it’s minimal, it helps to increase the speed of the website. Here’s how you can create a homepage instantly by importing the homepage template right from the page.
- After installing the plugin you will be able to use the blocks and template available in the library.
- When you create a new page for the homepage, instead of selecting blocks, click on the “Get Rise Blocks Templates” button available on the right side under Document.

- Rise Blocks Library will pop out. You can then select from the available templates to insert the design on the page.

- Alternatively, you can import components only as per your needs. Click on the components available on the top right of the Rise Blocks Library. Select your desired component and then click the insert button.

- After you finish importing the template, change the content and hit the publish button to make it live.
Conclusion ;
Hopefully, you have a clear idea of how to create a custom-designed homepage. You can either do it by yourself or import ready-made templates from the Rise Blocks Library. Importing from the library may ease out some of the challenges like responsiveness issues, creative placement of different components, etc. If you run through any issue while creating a custom homepage or have any questions regarding Rise Blocks, feel free to leave a comment in the section below.
The post How to create a homepage on WordPress website using Gutenberg block editor appeared first on Elohim Rehab-Care Associates.
]]>